Azure Project Overhead Part 1

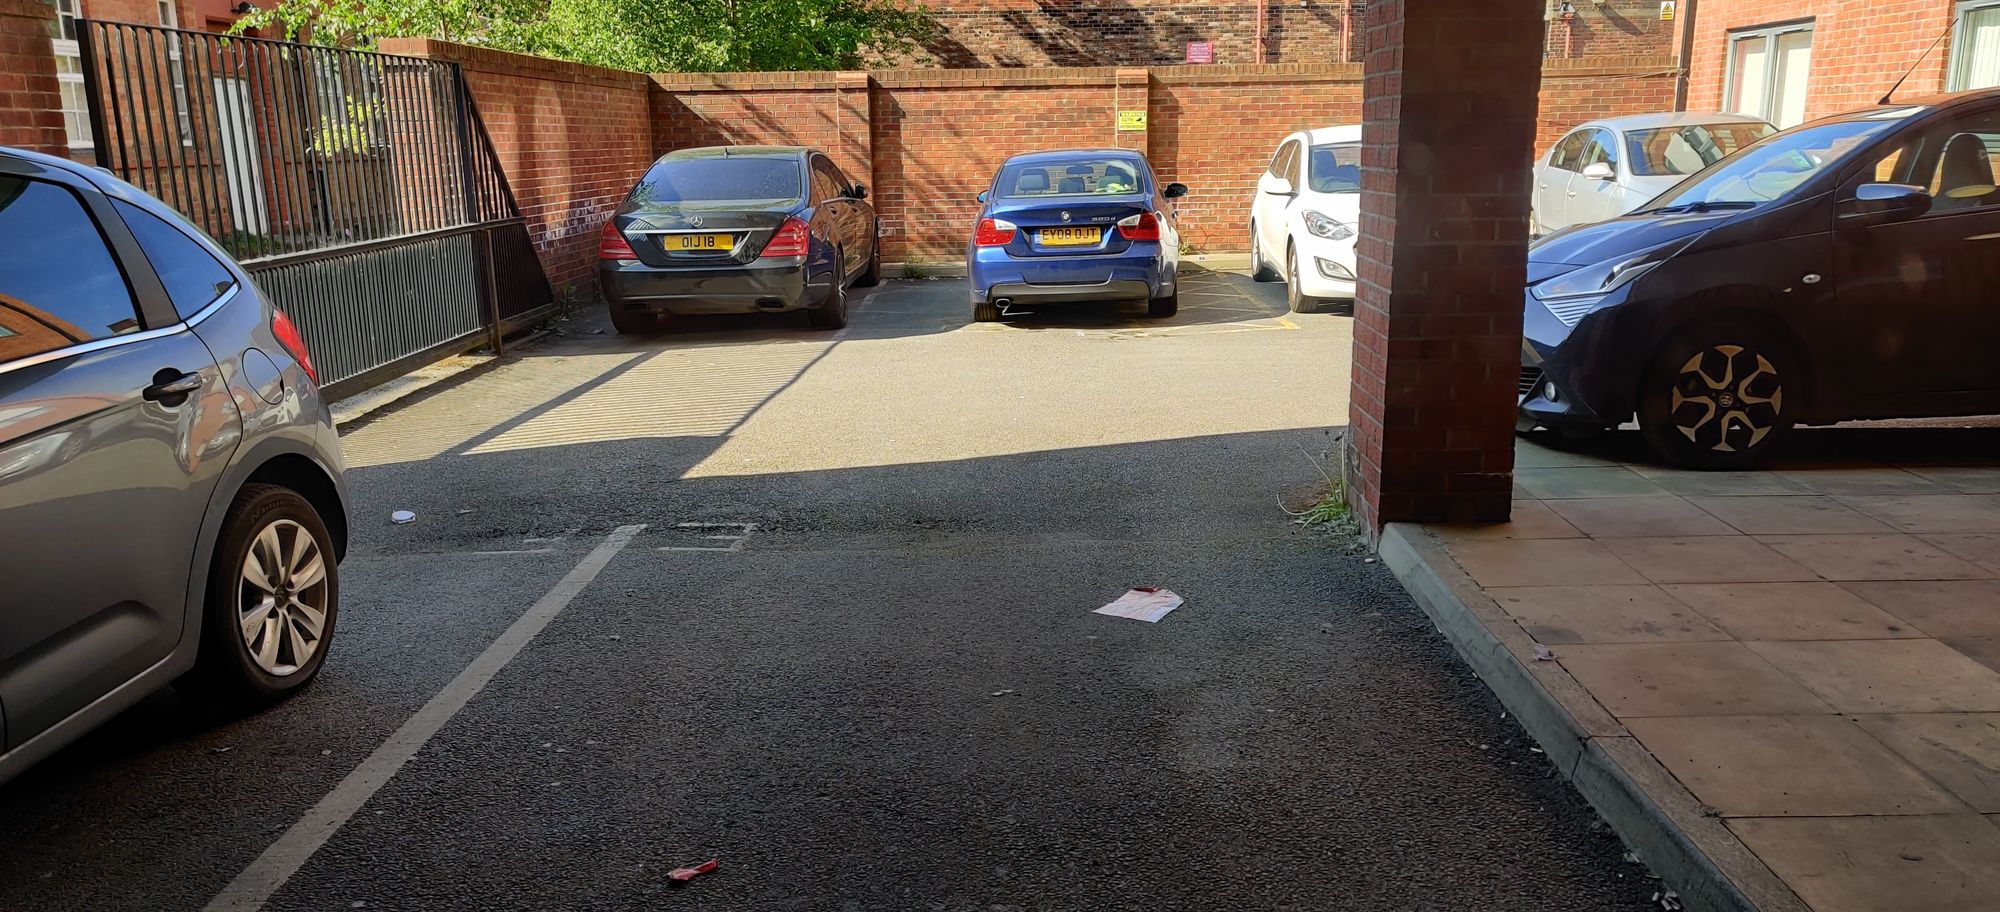
The idea behind the Azure Overhead project is to allow me to essentially see a live view (with images) looking out a window of whether there are available car parking spaces in the shared car parking area at home whenever I am away from home. It's beneficial because it saves me the hassle of having to drive in first, realizing no spaces are available, then having to reverse out (there's no other way) into a very busy main road with major blind-spots, which is potentially dangerous.
The project is built using the following:
- Raspberry Pi 3b that runs a .NET Core 3.1 application(now .NET5), and is equipped with a CSI camera (8MP v2.1). The Pi is located overlooking the target area(in my case the car park)
- Twilio
- SMS from a phone
- Resources in Azure (Functions, Table Storage, Blob Storage, IoT Hub, Azure Active Directory, Key Vault, Logic Apps)
The Pi 3b runs a .NET Core application that is responsible for communicating with Azure, capturing images, stores them locally and also sends them back into and sending them back into Azure blob storage for long term storage
For user interaction with the system, SMS is used because of its robust flexibility and ability to on-board new users where needed and removes the need to build applications that the user installs on their phone. To start, as a user, I send an SMS Message to the known Twilio virtual number. Inside my Twilio configuration page, I set up a webhook to call into my https Azure Function upon receiving an SMS using the Function key as part of the call. The Twilio phone number receives the SMS and automatically makes a request to an Azure Function with the SMS itself as part of the payload, which is nice(the SMS is carried in the 'Body' parameter of the Twilio payload, and the payload items are sent as form-data in the request).
The Azure Function on a Consumption Plan receives it and processes it by doing two things, inserting the sms into Azure Table Storage and then passing on the sms onto the Raspberry Pi using the IoT Hub. The Function implementation is set up as a Durable Function(with Function Chaining), but for the simplification of this post, it can be written as this (Nuget package references are available at the end of this post):
//Function is Functions v3, and uses netcore 3.1
//hubConnectionString is the iot hub connection string I stored securely
//as a Config setting on the Function host in Azure. Could use KeyVault too here, function config setting minimises the Function App's reach into the KeyVault
private string hubConnectionString = Environment.GetEnvironmentVariable("HUB_CONNECTION", EnvironmentVariableTarget.Process);
private ServiceClient serviceClient;

[FunctionName("ProcessMessage")]
public async Task<string> ProcessMessage(
[HttpTrigger(AuthorizationLevel.Function, "post")] HttpRequest req,
[Table("IncomingSMS")] CloudTable azureSmsTable, ILogger log)
{
	//In durable functions, this can be a simple Client function to acknowledge reception of the message, then kick off the Orchestrator function
    log.LogInformation($"Started Function...");
    string smsMessageBody = req.Form["Body"]; // get the 'Body' item from form-data

	//In durable functions, this Table Storage insertion can be its own Activity function
    TableOperation insertOp = TableOperation.Insert(new SMS()
    {
        PartitionKey = "PhoneMessage",
        RowKey = DateTime.UtcNow.ToString("yyyyMMddHHmmss"),
        Message = smsMessageBody
    });

    await azureSmsTable.ExecuteAsync(insertOp);

    log.LogInformation($"Inserted record...");
    log.LogInformation($"Now sending confirmation to Rpi...");

	//In durable functions this iothub cloud to device operation can be its own Activity Function
    serviceClient = ServiceClient.CreateFromConnectionString(hubConnectionString);
    var iotHubMessage = new Message(Encoding.ASCII.GetBytes(smsMessageBody));

    await serviceClient.SendAsync("RPi3", iotHubMessage);

    return "Processed the message, Thank you!";
}
The IoT Hub is great for it's bi-directionality between Azure and a device at the edge. The RPI first connects to KeyVault using a predefined Azure Active Directory service principal to be allowed to retrieve a shared access signature I have called DeviceHub to be used by the RPI. It then constantly listens for incoming message on the Iot Hub:
private static DeviceClient deviceClient;
private static HttpClient client = new HttpClient();

//Twilio
private static string accountSid = "";
private static string authToken = "";
private static string toNumber = "";
private static string fromNumber = "";

public static async Task Main(string[] args)
{
	var retries = 25;
	bool connected = false;
	while (retries!=0)
	{
		try
		{
			string rpiDeviceConnection = await AccessKeyVault("DeviceHub");
            deviceClient = DeviceClient.CreateFromConnectionString(rpiDeviceConnection);
            deviceClient.SetRetryPolicy(new ExponentialBackoff(int.MaxValue,
            TimeSpan.FromMilliseconds(100),
            TimeSpan.FromSeconds(10),
            TimeSpan.FromMilliseconds(100)));
			connected = true;
			break; // success!
		}
		catch (Exception ex)
		{
			Console.WriteLine("Failed to connect, retyring! because "+ ex.Message);
			--retries;
			Thread.Sleep(15000);
		}
	}

	if(connected == true)
	{
    	////now actively listen for messages here from the cloud
		Runner().Wait();
	}
}
To access the key vault, we can use the AAD service principal credentials from a file holding the clientId and clientSecret (There are more elaborate and more secure ways to retrieve these but will not be covered here, more is found here)
public static async Task<string> AccessKeyVault(string secretName)
{
    string clientId = "";
    string clientSecret = "";
    var appSettings = ConfigurationManager.AppSettings;

    try
    {
        using (StreamReader file = File.OpenText($@"{appSettings["machineLocation"]}"))
        {
            JsonSerializer serializer = new JsonSerializer();
            AzureSettings data = (AzureSettings)serializer.Deserialize(file, typeof(AzureSettings));
            clientId = data.AzureADCredsStore.Client_Id;
            clientSecret = data.AzureADCredsStore.Client_Secret;
        }
    }catch (Exception cr)
    {
        Console.WriteLine("Credential Error -- "+ cr.Message);
    }

		KeyVaultClient kvClient = new KeyVaultClient(async (authority, resource, scope) =>{
        var adCredential = new ClientCredential(clientId, clientSecret);
        var authenticationContext = new AuthenticationContext(authority, null);
        return (await authenticationContext.AcquireTokenAsync(resource, adCredential)).AccessToken;
    });

    var keyvaultSecret = await kvClient.GetSecretAsync("https://[NAME_OF_YOUR_KEY_VAULT].vault.azure.net", secretName);
    return keyvaultSecret.Value;
}

public class AzureSettings
{
	public AzureADCredsStore AzureADCredsStore { get; set; }
}

public class AzureADCredsStore
{
	public string Client_Id { get; set; }

	public string Client_Secret { get; set; }
}
A simple app config file for storing the location ('machineLocation') of the appSettings.json looks like this (I have mine interchangeable between Linux and Windows for dev purposes):
<?xml version="1.0" encoding="utf-8" ?>
<configuration>
	<appSettings>
		 <add key="machineLocation" value="/home/pi/Arm32/appSettings.json"/>
		<!-- <add key="machineLocation" value="C:\\appSettings.json"/>-->
	</appSettings>

</configuration>
The Iot Hub will continuously listen for new messages coming in. Each message is used as a trigger to take a new image:
private static async Task Runner()
{
	Console.WriteLine("Listening for messages from the cloud");

    //Create and access some resources once only to help improve speed
	CameraController controller = new CameraController();

    string storeAccount = await AccessKeyVault("StoreAccount");
    string logicAppUrl = await AccessKeyVault("LogicAppUrl");

    //twilio details can be found from your twilio dashboard/account
    //I have then stored mine in Azure Key vault as secrets
    toNumber = await AccessKeyVault("TONUMBER");
    fromNumber = await AccessKeyVault("FROMNUMBER");
    accountSid = await AccessKeyVault("TWILIOACCOUNTSID");
    authToken = await AccessKeyVault("TWILIOAUTHTOKEN");

	CloudStorageAccount storageAccount = CloudStorageAccount.Parse(storeAccount);
	CloudBlobClient blobClient = storageAccount.CreateCloudBlobClient();
	CloudBlobContainer container = blobClient.GetContainerReference("mycontainer");
	CloudTableClient tableClient = storageAccount.CreateCloudTableClient();

	while (true)
	{
		Message receivedMessage = await deviceClient.ReceiveAsync();
		if (receivedMessage == null) continue;
		string smsData = Encoding.ASCII.GetString(receivedMessage.GetBytes());

		Console.WriteLine($"Received message: {smsData}");
		Console.WriteLine("Taking Image..");
		DateTime timeStamp = DateTime.Now;
		byte[] imageData = new byte[] { };
		imageData = CaptureImage(controller,17);

		CloudBlockBlob blockBlob = container.GetBlockBlobReference("recordedImage" + timeStamp.ToString("yyyyMMdd-HH-mm-ss") + ".jpg");

		//upload to azure synchronously to only let user know when blob is truly guaranteed to exist in Azure
		blockBlob.UploadFromByteArrayAsync(imageData, 0, imageData.Length).Wait();

		//alert to phone user
        string recordedblockBlobName = "recordedImage" + timeStamp.ToString("yyyyMMdd-HH-mm-ss") + ".jpg";

		PostCompletionMessage(recordedblockBlobName, logicAppUrl);

		Console.WriteLine("Finished");
		try
		{   //each message on the iot hub must be 'completed' to be dequeued properly after GetBytes() has been used on it.
			await deviceClient.CompleteAsync(receivedMessage);
		}
		catch (Exception e)
		{
			Console.WriteLine($"Message exception {e.Message}");
		}

	}
}
I also customised the image taking process in order to help reduce latency. When taking an image, the bytearray containing the raw image is immediately sent into Blob storage rather than saving a file first to the relatively slow Microsd card and then reading it again from disk. The csi camera capture timeout is set to 600ms to allow for a short time for the light sensors to open and allow the image bytes to be returned. The reason for using the specific resolution of 2700 x 2030 will be discussed in Part 2. I also added customisations to allow the camera to take a more brightened up image as it gets dark during the evening time and use nightmode, which in the UK starts at around 5pm in winter and around 7pm in summer (the implementation here is for winter but calibration for automatic switching between winter and summer over the course of the year can be added further). The image bytes are captured and then returned to passed onto Azure blob storage.
private static byte[] CaptureImage(CameraController controller, int nightStart)
{
    var rightNow = DateTime.Now;
    var eveningBeginning = new DateTime(rightNow.Year, rightNow.Month, rightNow.Day, nightStart, 0, 0);
    var eveningEnd = new DateTime(rightNow.Year, rightNow.Month, rightNow.Day, 23, 59, 59);
    return controller.CaptureImage(new CameraStillSettings()
    {
        CaptureHeight = 2030,
        CaptureWidth = 2700,
        ImageSharpness = 45,
        CaptureJpegQuality = 100,
        CaptureExposure = ((rightNow > eveningBeginning) && (rightNow < eveningEnd)) ? CameraExposureMode.Night : CameraExposureMode.Auto,
        ImageBrightness = ((rightNow > eveningBeginning) && (rightNow < eveningEnd)) ? 70 : 50,
        CaptureTimeoutMilliseconds = 600
    });
}
After uploading to blob storage, we can alert the user by SMS and then also trigger a Logic App through a direct HTTP request from the .NET app. (Note that it is also a valid solution to use Azure EventGrid as a fast notification mechanism to notify the Logic App that the blob has been created, however should you need to send in lots of data parameters into the Logic App, you may bundle(aka smuggle in this case) them in into the EventGridEvent object's Data property, but this may not be the most elegant of solutions and starts to break the principle of EventGrid, which is to carry lightweight events only to receivers, and not messages where data payloads are present). Here we will cover the use of a direct HTTP request. The body of the the request contains the fileName and this will be searched for in the Logic App:
private static void PostCompletionMessage(string recordedblockBlobName, string logicAppUrl)
{
SendTextMessage("Imaging Complete!! Check Email");
var uri = new Uri(logicAppUrl);
var request = new HttpRequestMessage(HttpMethod.Post, uri);
request.Content = new StringContent("{" + $"\"fileName\":\"{recordedblockBlobName}\"" + "}", Encoding.UTF8, "application/json");
client.SendAsync(request);
}
private static void SendTextMessage(string messageBody)
{ //use Twilio.Rest.Api.V2010.Account namespace here
TwilioClient.Init(accountSid, authToken);
MessageResource.Create(
body: messageBody,
from: new Twilio.Types.PhoneNumber(fromNumber),
to: new Twilio.Types.PhoneNumber(toNumber));
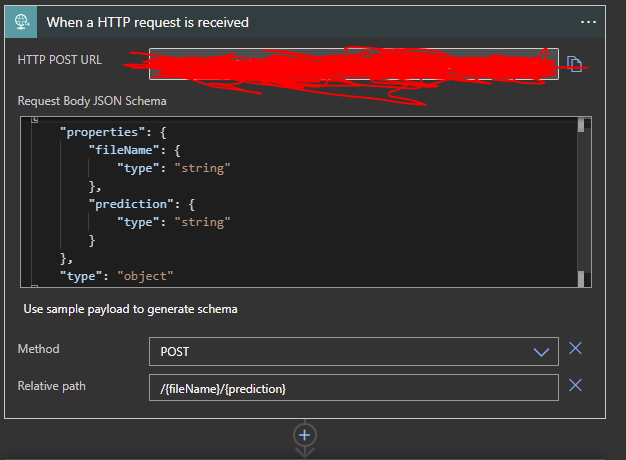
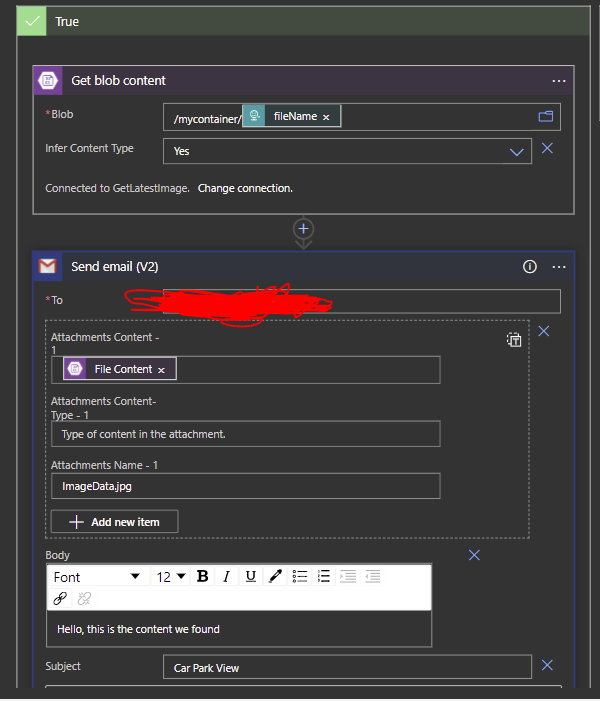
}At this point, the image taken by the camera now exists in a known container in Azure blob storage. The Logic App will be triggered by an HTTP request that contains the recorded filename (recordedblockBlobName) of the image that was taken earlier. The Logic App will then look for the filename of this image in the known blob storage container name. Then there is a workflow to send an email with the taken image to my email address.
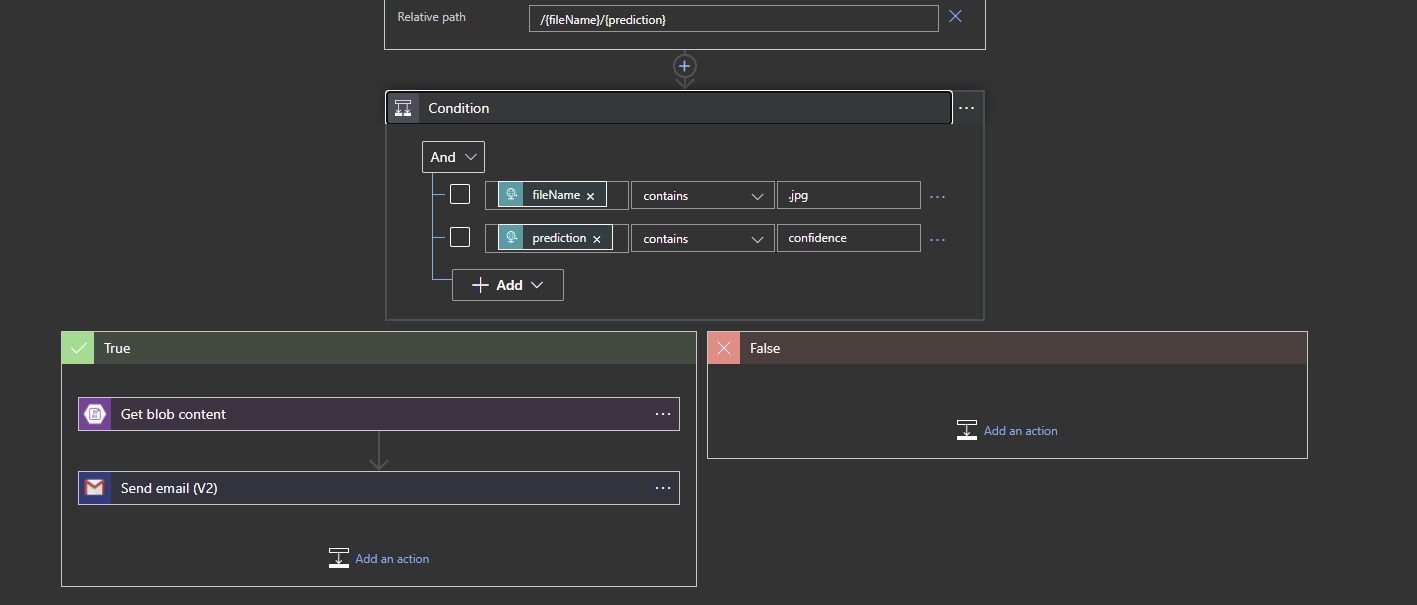
We can set true and false scenarios. False is not set here but we could send error alerts if we wanted to. In the True Scenario:
An earlier incarnation of this process did not send a singular HTTP request to the Logic app. Rather, it let the Logic App 'constantly check' the blob container every 10 seconds for any new images and this new image arrival event was then used as the trigger to send an email. This worked, however I soon realised that these 10second checks had costs attached, very negligible per check but that added up to an unnecessary £2.60 over some weeks. Lesson learned there!! Some important info to remember with emails: If you plan to use a Gmail email address as your email, it is important to read and follow this post from Microsoft (https://docs.microsoft.com/en-us/azure/connectors/connectors-google-data-security-privacy-policy) on how to correctly connect the Gmail address (or other Google connectors) to your Azure Logic App in order to adhere to Google's security and privacy requirements.
Conclusions on Part 1
This project was borne out of the need to know what the state of an area looked like before actually going there(in this case a car park), because the consequences of reversing into a main road with heavy traffic was a legitimate concern. By essentially having an eye on the park that I could call upon at any time, I could make an informed decision on whether to just go inside without hesitation or park outside on the public road (and then work out a strategy for avoiding parking tickets afterwards!!) This project is confirmed to work on RPI3b and also RPI4 using Raspian and can work on an ARM device with a CSI camera port like a Jetson Nano (Jetson Nano not fully tested.)
Some other avenues I wanted to explore from this were areas such as RCS which would remove the need to use email as a transport mechanism for images back to the user. RCS enables rich media such as images, video and audio to be carried within the same SMS messaging app that supports the RCS Universal Profile. The default Google Messages app on Android 5+ supports this well (even without native network carrier support, Google Messages will utilise Google servers) and would be a good candidate for an implementation for this. The user would send a text message into Twilio, through to Azure, through to the RPI3 , then the RPI3 would send over an RCS message containing the image itself rather than having the user receive an SMS and then open their email app separately. RCS was available on Twilio but for select businesses at the time I created Overhead. After months of communications with Twilio, I was informed that support for RCS on Twilio was being wound down which was unfortunate. RCS is not currently supported on Apple iOS
Package References:
<!--RPI NETCore references-->
<PackageReference Include="Azure.Identity" Version="1.2.3" />
<PackageReference Include="Iot.Device.Bindings" Version="1.0.0" />
<PackageReference Include="Microsoft.AspNetCore.Hosting.Abstractions" Version="2.2.0" />
<PackageReference Include="Microsoft.Azure.Devices.Client" Version="1.34.0" />
<PackageReference Include="Microsoft.Azure.KeyVault" Version="3.0.5" />
<PackageReference Include="Microsoft.Azure.Services.AppAuthentication" Version="1.5.0" />
<PackageReference Include="Microsoft.Extensions.Configuration.Json" Version="2.1.0" />
<PackageReference Include="Microsoft.IdentityModel.Clients.ActiveDirectory" Version="5.2.8" />
<PackageReference Include="Microsoft.VisualStudio.Azure.Containers.Tools.Targets" Version="1.10.9" />
<PackageReference Include="System.Net.Http" Version="4.3.4" />
<PackageReference Include="Twilio" Version="5.58.0" />
<PackageReference Include="Unosquare.Raspberry.IO" Version="0.27.1" />
<PackageReference Include="WindowsAzure.Storage" Version="9.3.3" />
<PackageReference Include="System.Configuration.ConfigurationManager" Version="5.0.0" />

<!--Azure Function references -->
<PackageReference Include="Microsoft.Azure.Devices" Version="1.28.1" />
<PackageReference Include="Microsoft.Azure.WebJobs.Core" Version="3.0.14" />
<PackageReference Include="Microsoft.Azure.WebJobs.Extensions.DurableTask" Version="2.1.1" />
<PackageReference Include="Microsoft.Azure.WebJobs.Extensions.Storage" Version="3.0.10" />
<PackageReference Include="Microsoft.NET.Sdk.Functions" Version="3.0.3" />
In Part 2 I add image classification and have internal dilemmas on inference engines
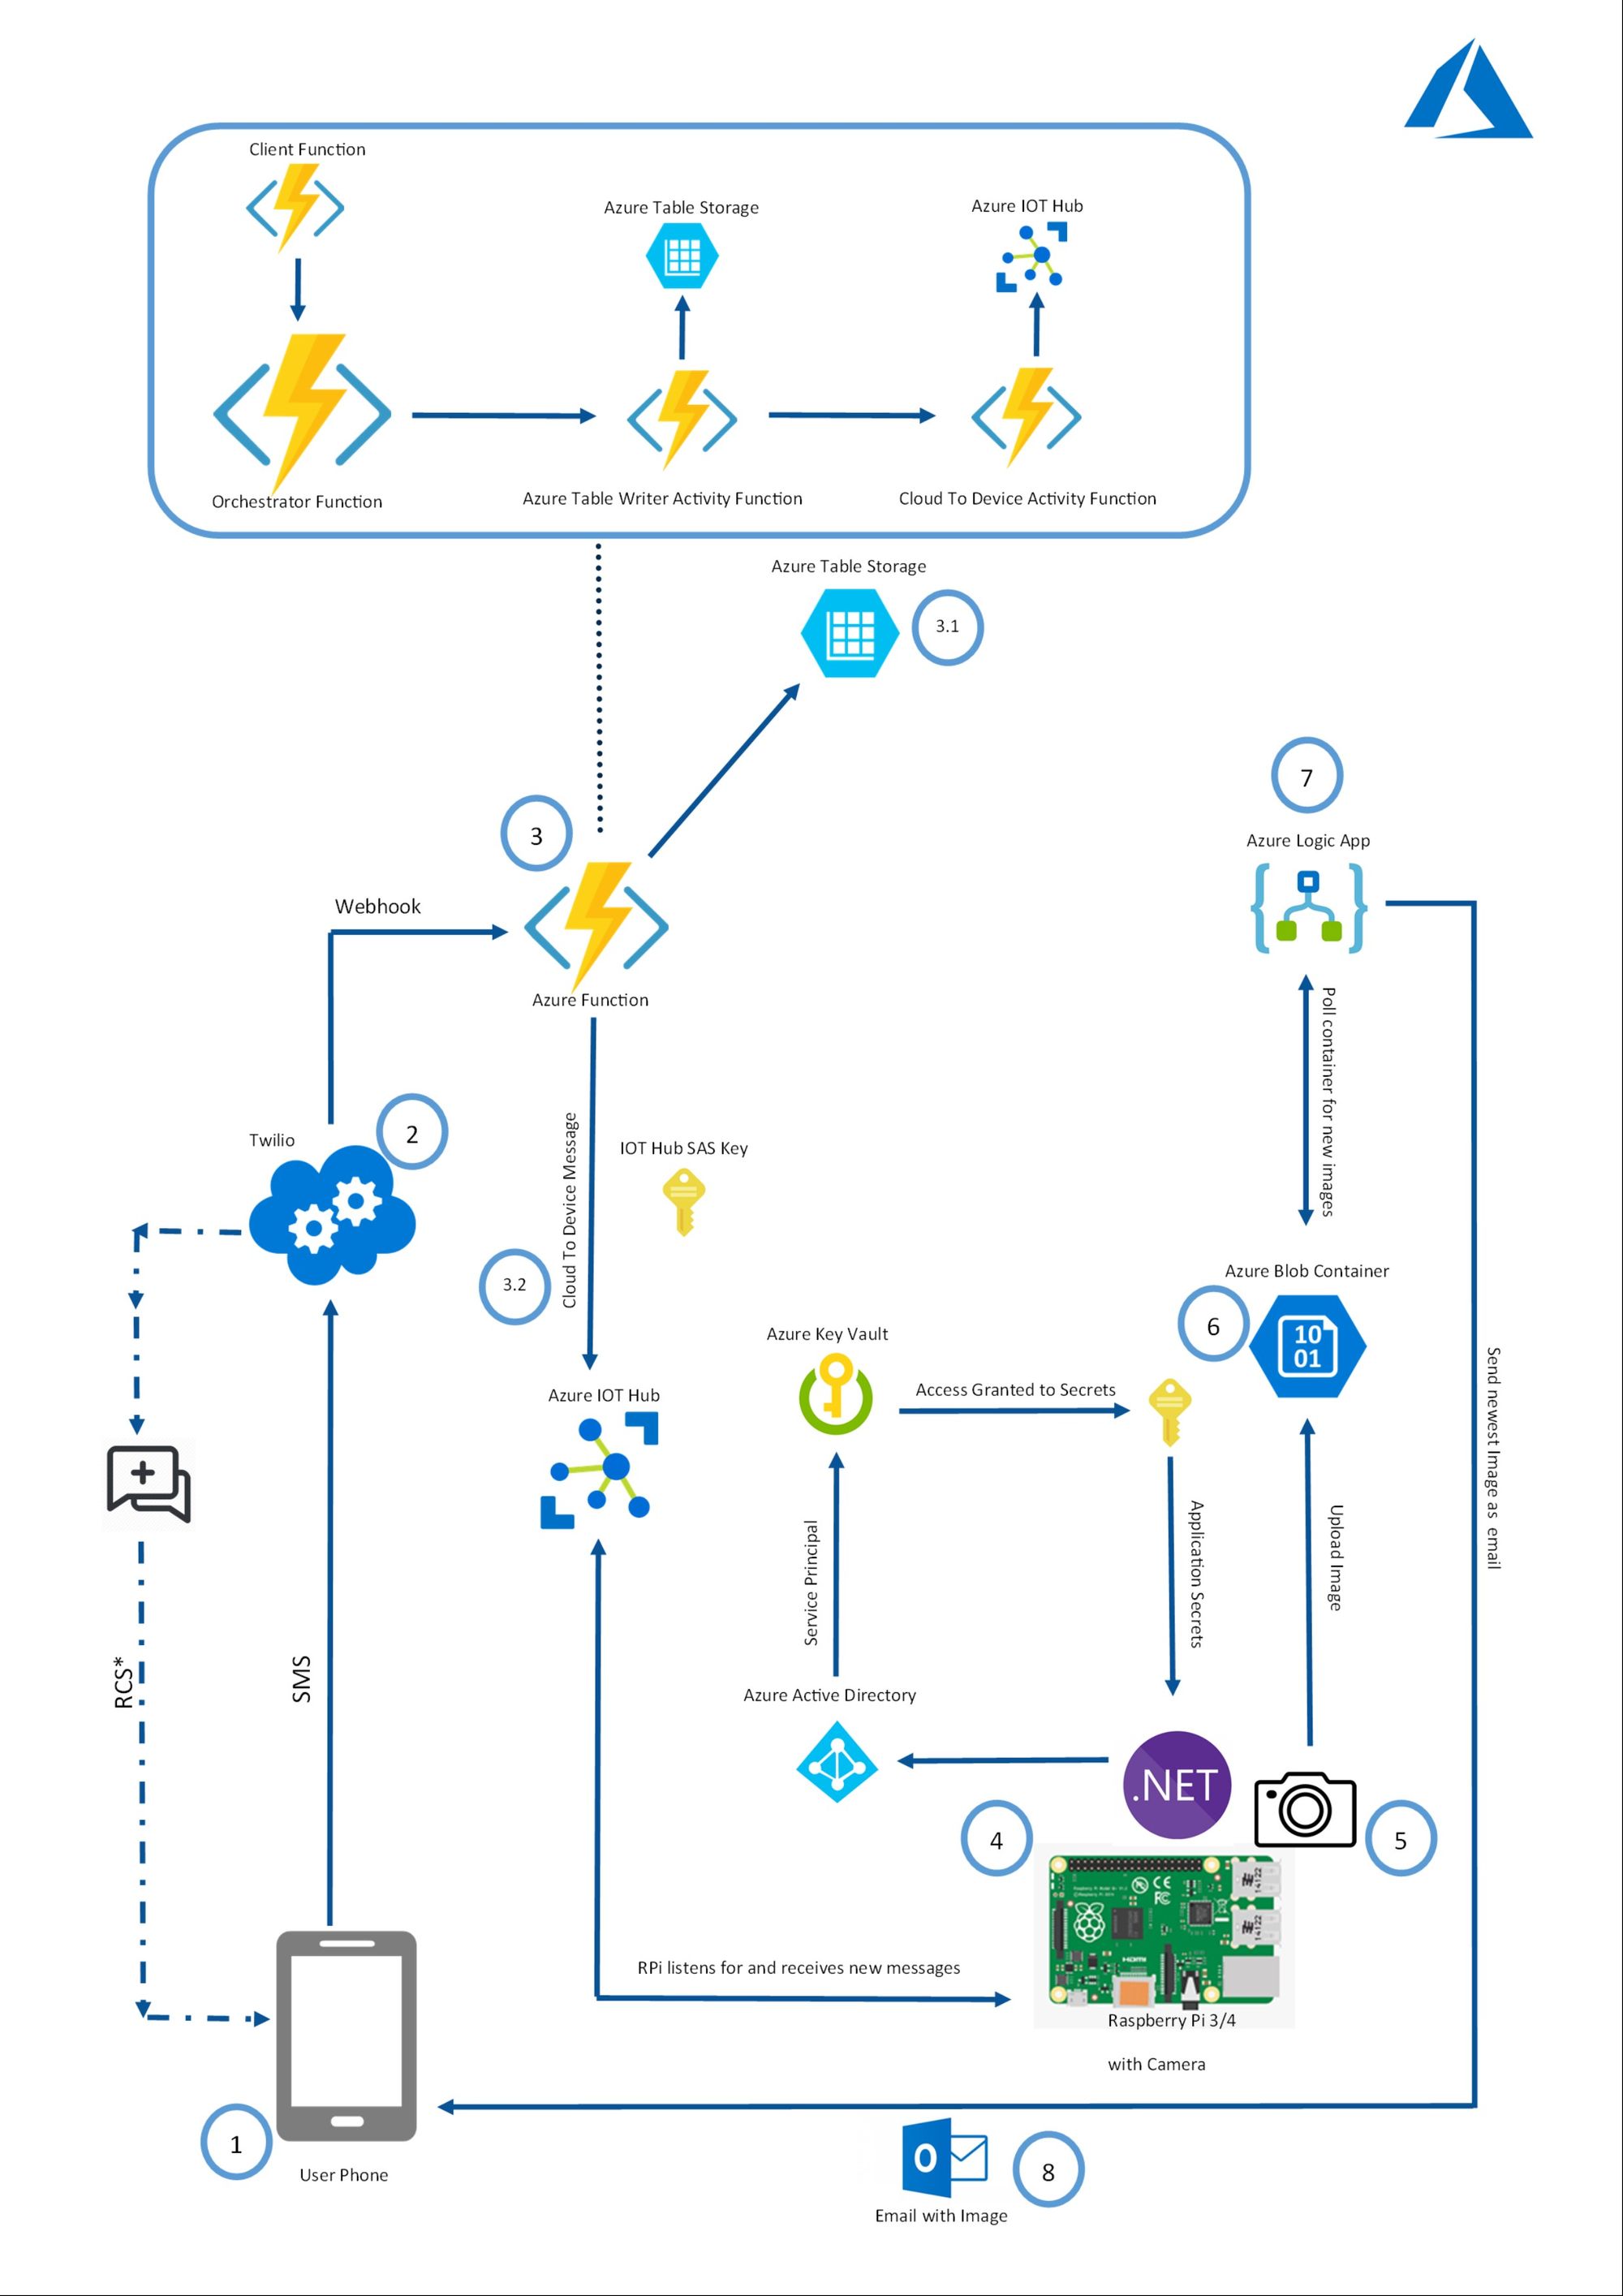
The original architecture of the application looked like the following: