Azure App Service change Publish Model from Code to Container


With Azure App Service (Azure Web App), it is possible to modify the publishing model of the application from Code to Container after it has been published using the Azure CLI. The reason you may want to change to a Container based publishing model could be to take a step to a more seamless continuous delivery mechanism for your app where you want to take advantage of the consistency provided by containerization. By using containers on App Service, you can also gain back control on what exact web framework and framework version your application relies on, and not be restricted to the limited web frameworks provided by Azure App Service.
In this quick post, we take a look at publishing an Azure Web App under the Code publishing model first (as .NET Runtime) and then modifying it to a Container publishing model with the Azure CLI and letting the Azure Web App source our new Docker Image from Azure Container Registry.
We will also remember to DELETE any unused Azure resources afterwards.!!
Publish Azure Web App as .NET Runtime first
Let's say we have a local ASP.NET Core Web App. We can publish this web app to an Azure App Service under a Linux B1 or S1 tier App Service Plan (or higher but not FREE tier) through the Visual Studio 2022 wizard. Or to do the same from Powershell, we can navigate to our project path with our .csproj file, and then execute the following Azure CLI commands. I will assume you are using Azure CLI version 2.49 or later:
# YOU MUST BE AT THE PATH WHERE YOUR CSPROJ FILE IS LOCATED

# Login to your Azure account
az login

# Set variables
$resourceGroup="myResourceGroup"
$planName="myAppServicePlan"
$webAppName="myGloballyUniqueWebAppName"
$location="ukwest"
$publishPath="{ProjectPathWithCSProjFile}\bin\Release\net7.0\publish"

# Create a resource group
az group create --name $resourceGroup --location $location

# Create App Service Plan
az appservice plan create --name $planName --resource-group $resourceGroup --sku S1 --is-linux

# Create a web app
az webapp create --name $webAppName --resource-group $resourceGroup --plan $planName --runtime "DOTNETCORE:7.0"

#Publish Local web project
dotnet publish --configuration Release

#Zip up published files (this can produce a corrupted zip file, but can be fixed!!)
Compress-Archive -Path $publishPath\* -DestinationPath ./publish.zip

# Deploy to Azure app service as zip deploy
az webapp deployment source config-zip --resource-group $resourceGroup --name $webAppName --src ./publish.zip
Using Powershell, this set of commands will create an S1 service plan tier Linux App Service and deploy our local web app to Azure App Service
If you get an error on the webapp deployment step where the extraction of the zip file fails (because of a corrupted zip file), this is related to a bug in an old version of the Compress-Archive cmdlet!.See here https://github.com/PowerShell/Microsoft.PowerShell.Archive/issues/71
Fix this by running the following in an Administrator Powershell session:
Install-Module Microsoft.PowerShell.Archive -MinimumVersion 1.2.3.0 -Repository PSGallery -ForceThen you can delete the previously created zip file, then retrying from the Compress-Archive command onwards again. (Was a chin scratcher that one 🤔)
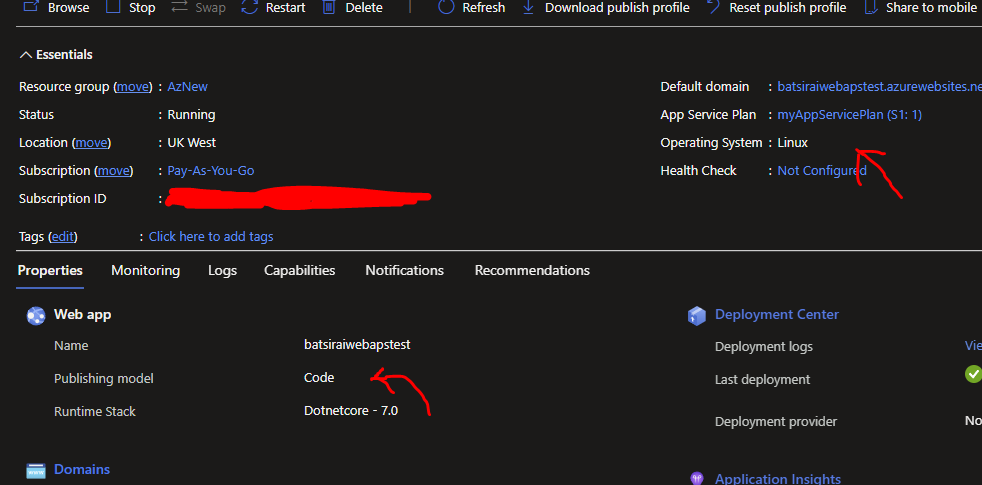
With a successful deployment, check the new web app in the Azure Portal. You should have a Linux Azure App Service on the S1 App Service Plan, where the runtime of the app is .NET (Code).
Publish your app as Docker Image to Azure Container registry
Now let's say we change our business processes and want to have containerization workflows.
We can publish a local Docker image of our local web app to Azure Container Registry (or to Docker Hub) and have private access to our image. To keep this blog post brief we can use Visual Studio 2022 and its new 'Docker Desktop-less' Docker image publishing capabilities to a container registry for the .NET SDK!! We actually don't require Docker Desktop on our machine to even build and publish our Docker image to Azure Container Registry.
To do this in Visual Studio 2022, Right Click on your Visual Studio Project, Publish, Azure, then pick Azure Container Registry. Here you can pick an existing Azure Container Registry or create a new one under the Basic tier to keep costs low, click Next, then you will see the following screen and you can pick .NET SDK:
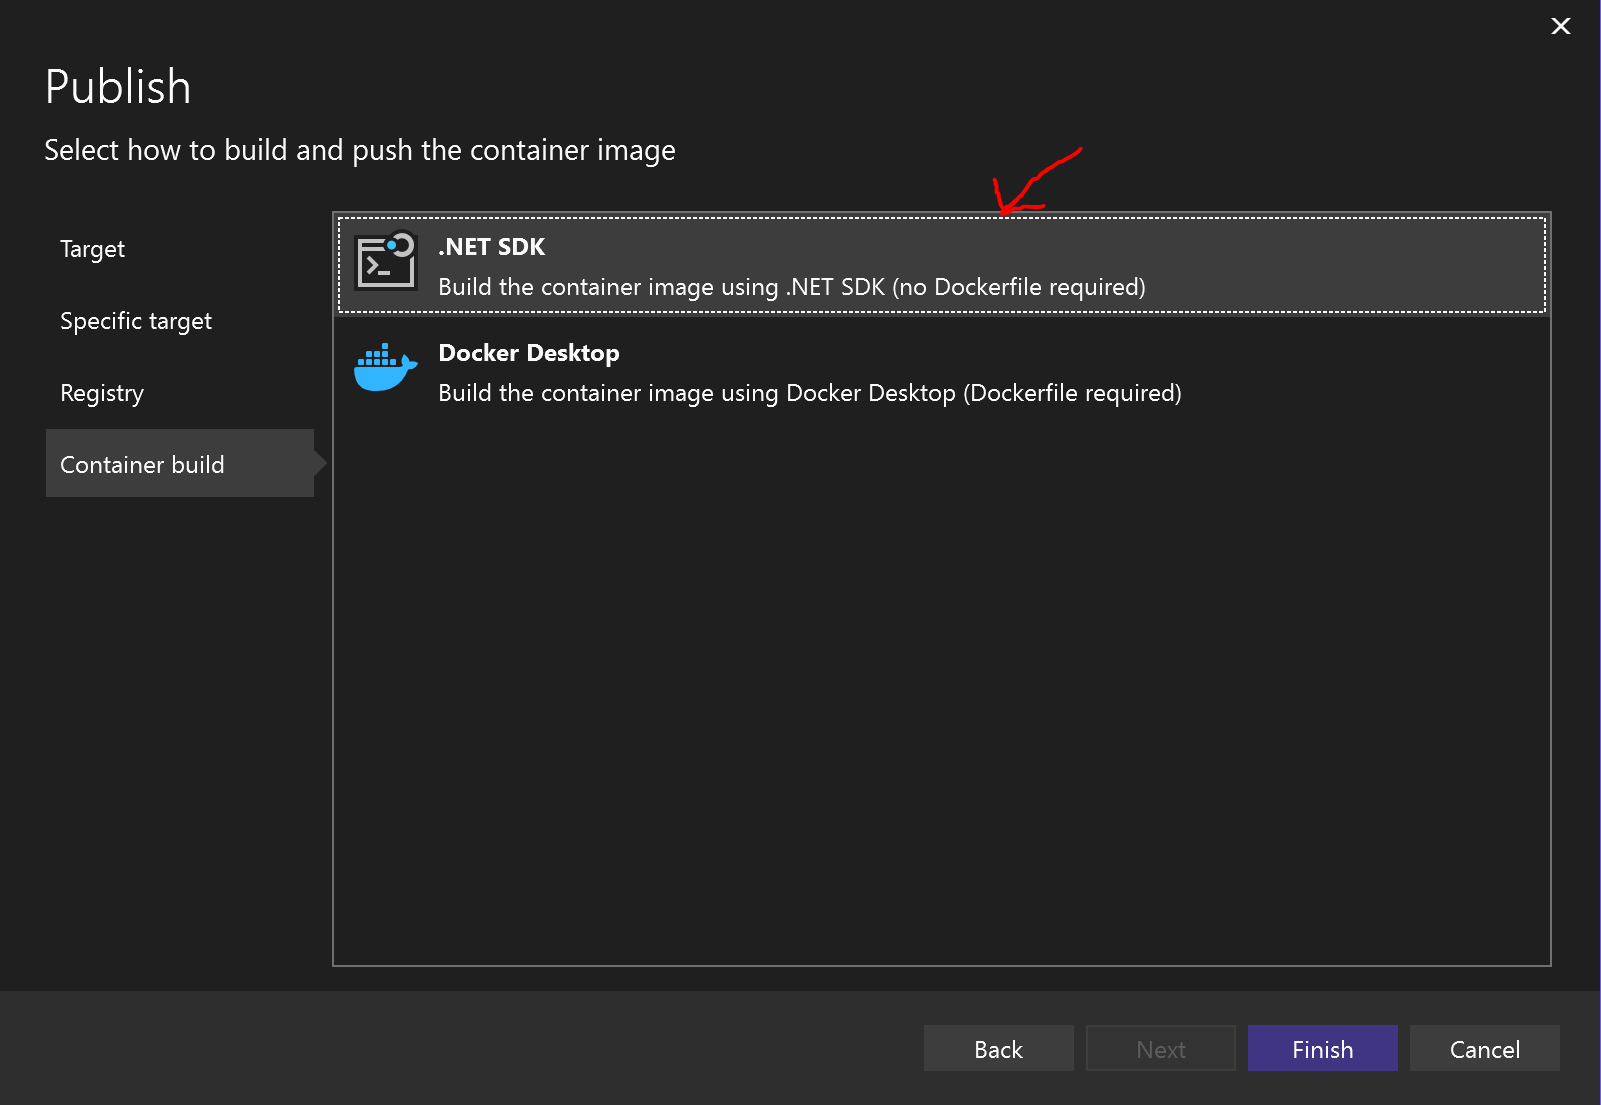
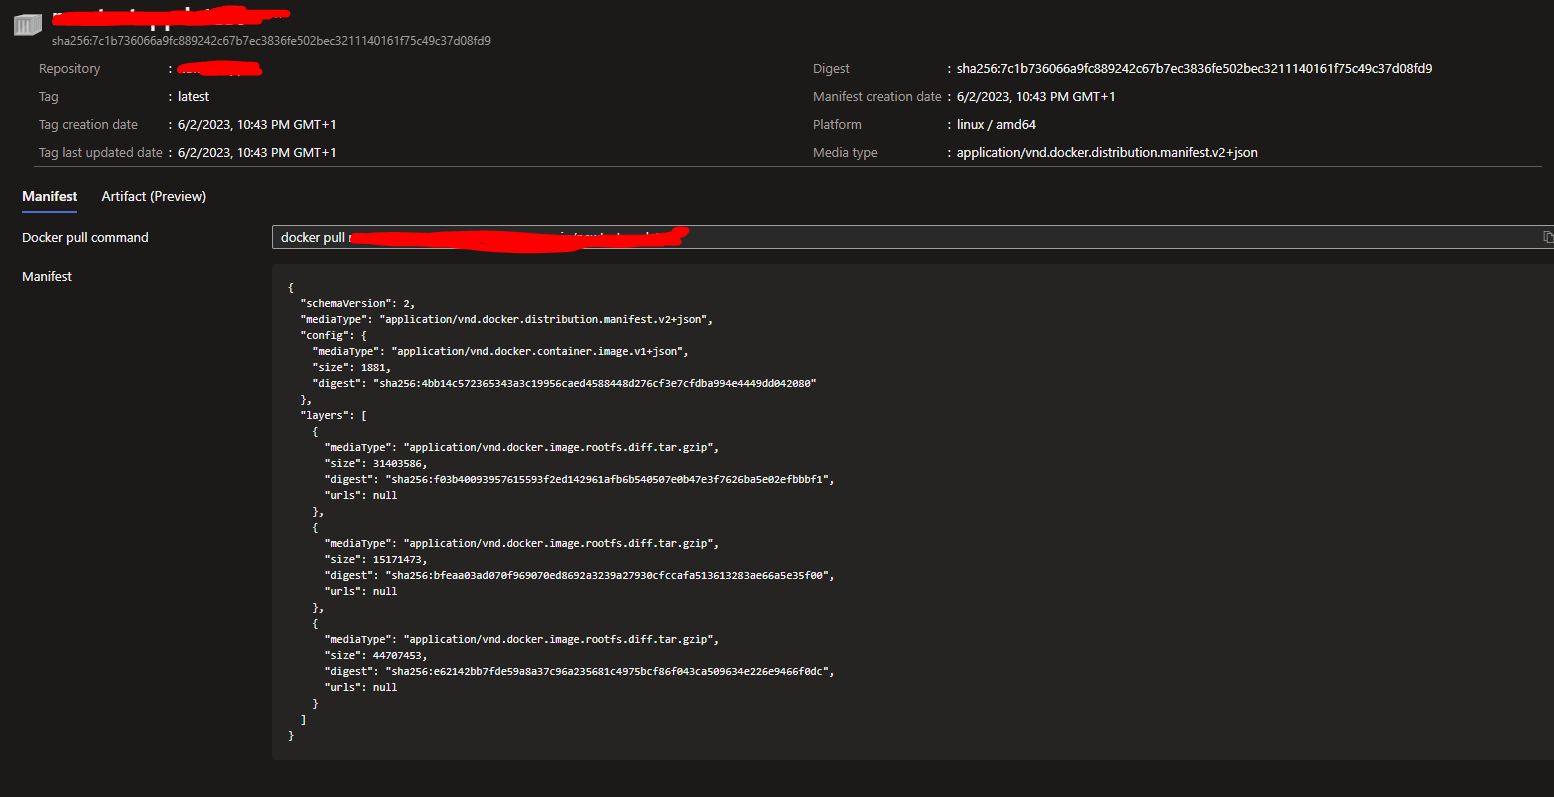
Click Finish and then Publish. (If the Publish has failed, make sure to install the Microsoft.NET.Build.Containers Nuget Package and then retry) Once done, check the Azure Container Registry in your Portal with your new Docker Image in its Image Repository (from the Repositories section):
Modify the Publishing Model from Code to Docker
Now with our Docker Image for our App Service available in the Container Registry, we are now able to change the publishing model of the App Service by executing the following in a STANDARD COMMAND PROMPT (Powershell caused trouble with the quote interpretations for me!!):
az webapp config set --name <webapp-name> --resource-group <resource-group-name> --linux-fx-version "DOCKER|<yourACRRegistryName.azurecr.io/yourimage:yourtag>"
Command to set publish model to 'Container'. You can find the the Docker image path from your docker pull command in the Azure Container Registry. This will apply for a Docker Image in a private Docker Hub repository too
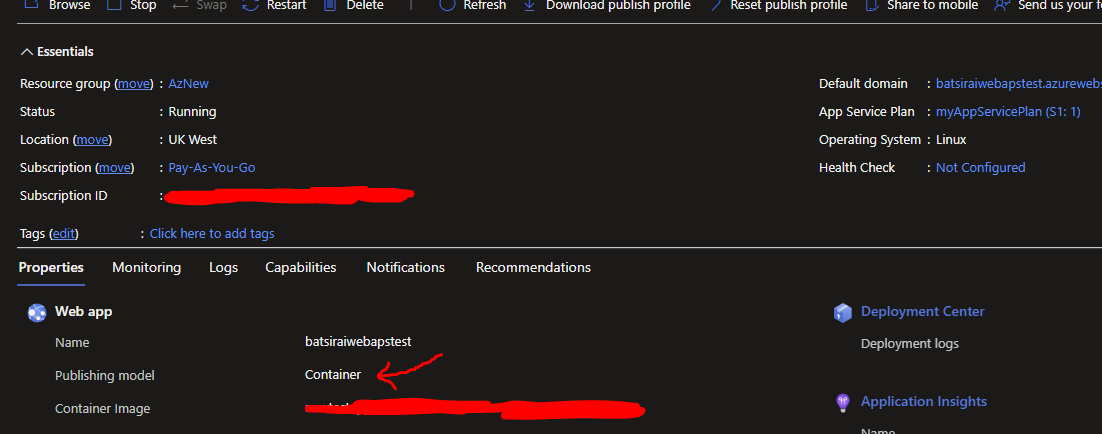
Executing the above will switch the publishing model to Docker from Code. Fully refresh your Azure portal and you now notice the publishing model is set to Container for the App Service and also set to use the container Image from ACR!!:
We are not quite done yet. If you try to access the application from the default domain... Application Error!!!!. What's happening?. Permissions between the App Service and Container Registry of course, let's fix that 😊.
Access Control
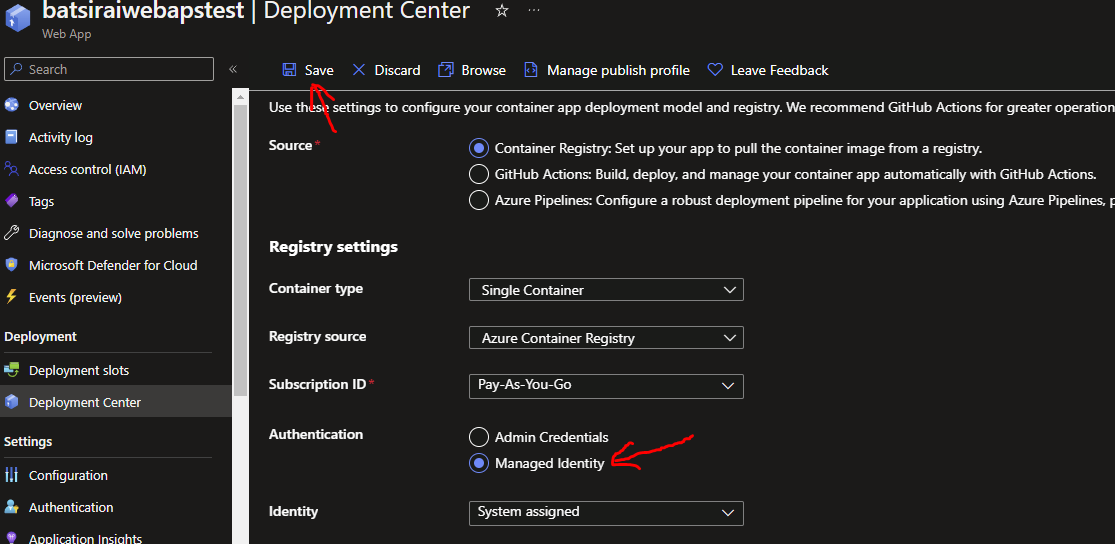
Final step. Now although the Azure App Service is now pointing to our Docker Image in the Azure Container Registry, it does not quite have the permissions to pull and use it. To set the right permissions, I found it best and easiest to set a Managed Identity for the App Service by going to Deployment Center then set the Authentication to 'Managed Identity' and then pick and select your Container Registry and Image, then Save:
Refresh the Azure Portal one more time, go to the default domain of the Azure App Service... and our application is now visible and running as a Docker Container on Azure App Service after being switched from Code!!